

Introduction
Using mustache.website you can also
host your One Page Landings!
mustache.website is a free service you can use to send your Email Marketing Campaigns and your Transactional Messages.
Is this really free?
Yes.
Once registered you get 100 email credits to check how it works. If you decide to continue using the service, we just ask you to validate your communication practices are strictly under CAN-SPAM compliance.
Contacts List
Add A New Contact
Check the how-to video tutorials at
https://vimeo.com/channels/1262663
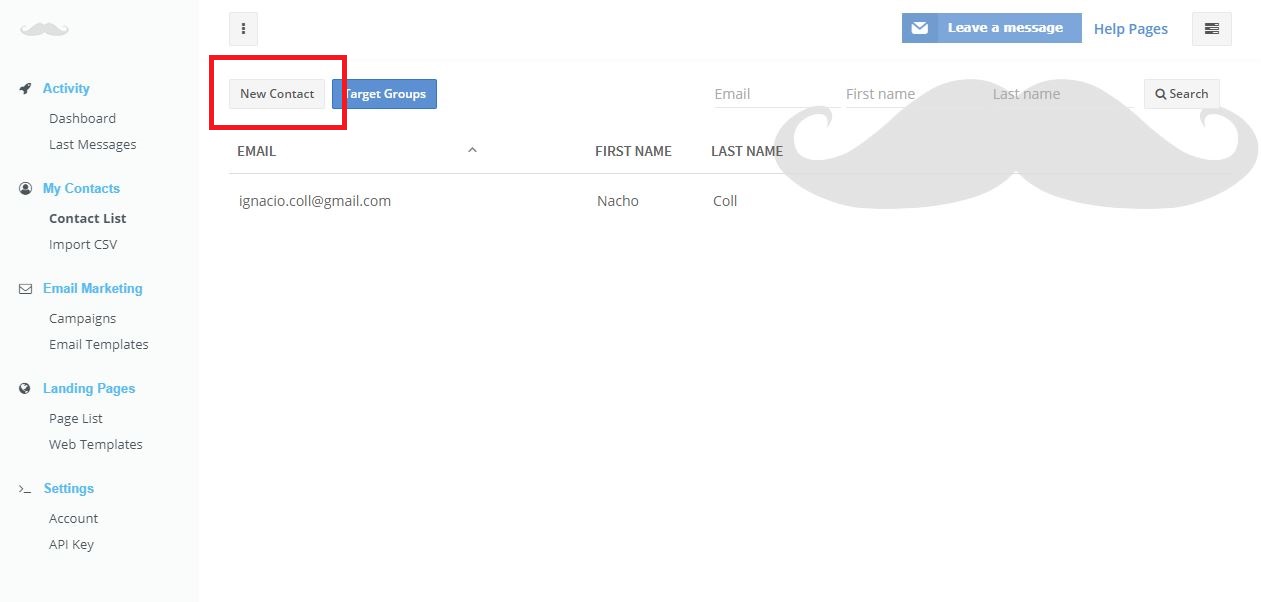
To manually add a new contact, just select My Contacts > Contact List menu option and then click on the New Contact button.
A new contact form is displayed so you can enter your contact attributes and save.
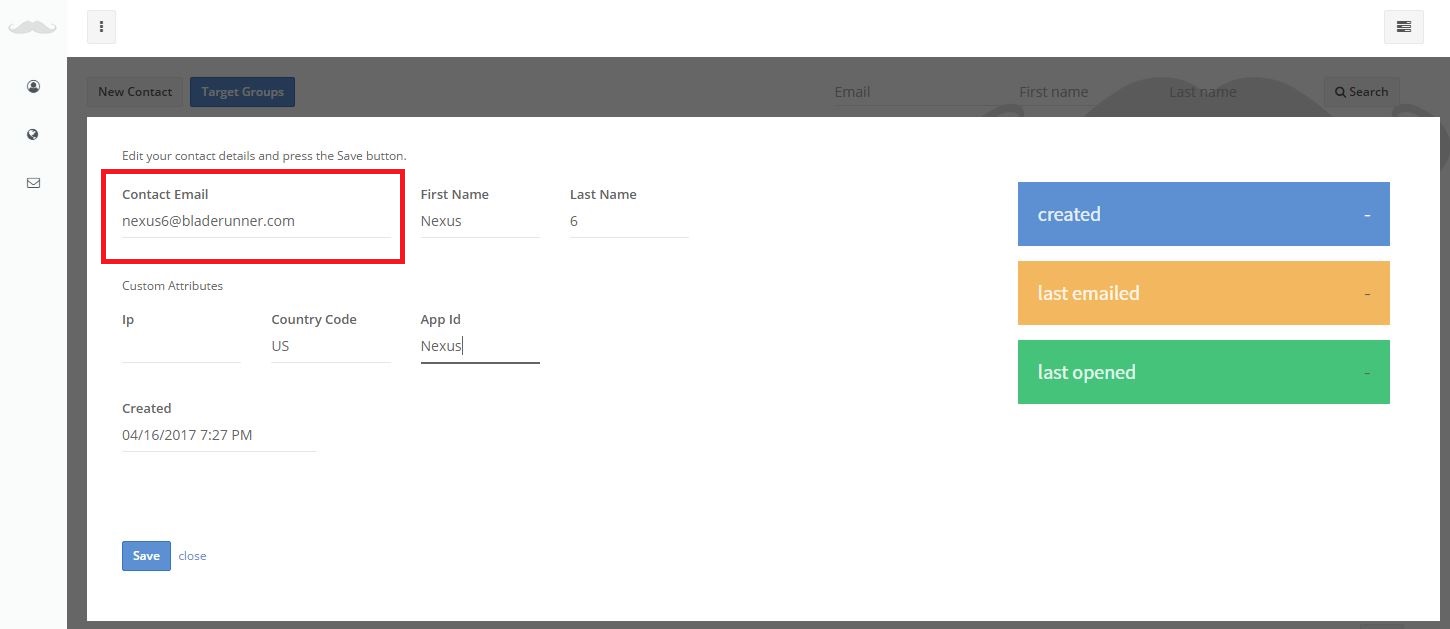
Custom Attributes
If you need some custom attributes just check the next video to get instructions.
Import Contacts
It's recommended that you initially
try to import some small files with
a few records to check the results.
To get an introductory overview of the import process, please check the next video then read the related help instructions.
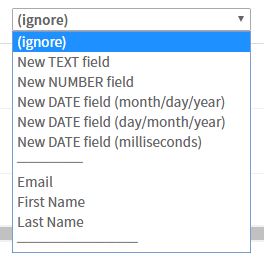
Before you start, check that your CSV file follows the next rules:
- The first row contains the column names.
- There is an Email attribute column.
- Values are Numbers, Texts or Dates.
- Date columns use one of the allowed formats:
- DD/MM/YYYY, e.g. 24/03/2017
- MM/DD/YYYY, e.g. 01/25/2015
- Unix time format (milliseconds), e.g. 1492364709813 representing Sun Apr 16 2017 19:45:09 GMT+0200.
To start the import process click on My Contacts > Import menu option and select your CSV file.
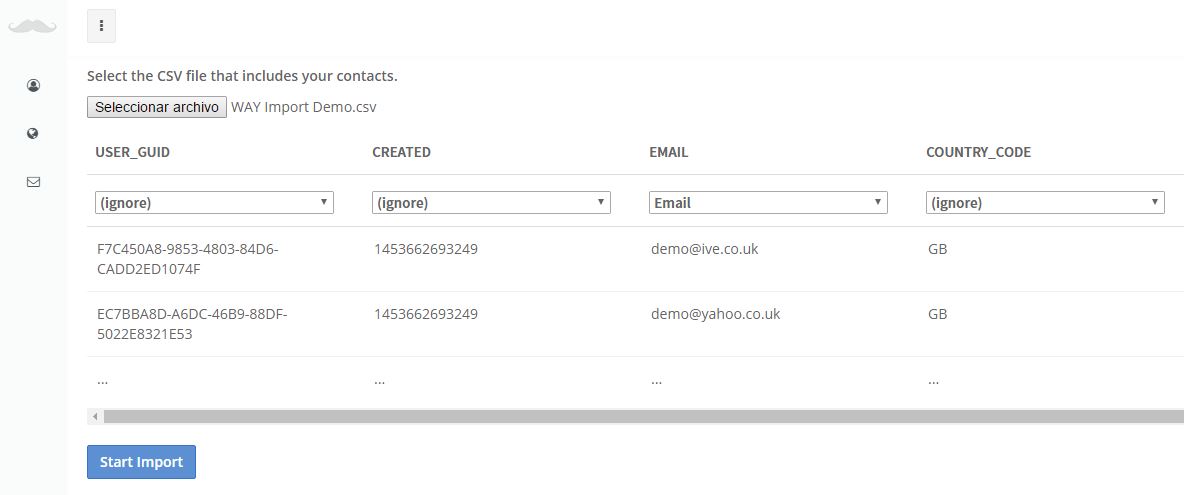
Double check your CSV file column mapping!
Take a look at the columns mapping that it’s proposed and select the appropiate option for each column.
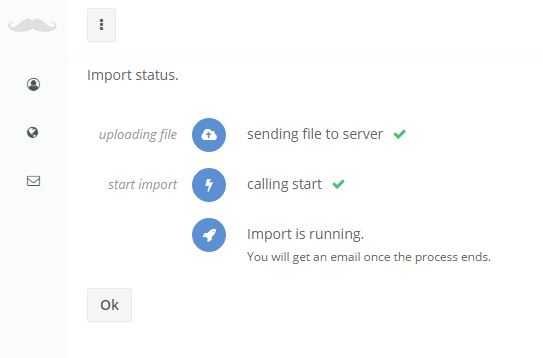
When you click the Start Import button, the
CSV file is sent to the system and
each row is then processed.
Once you’ve finished mapping your CSV file columns, click on the Start Import button to start the import process.
You will get the import results on your
account email, including the total
processed contacts and the total
imported contacts number.

If there are errors while processing
the file, you will also get some
error details.
Target Groups
If no new Target Groups are created, you're
just going to be able to send a Campaign
to all your contacts.
When you create a new Email Marketing campaign, you select the Target Group to which you want to send the message. That means that if you want to send your campaign to a specific group of contacts, you need to create a new Target Group that defines that group (e.g. Canada Users).
A Target Group is a database filter
definition.
To create a target group, just go to Contacts List menu option and click on the Target Groups button. Add the attributes values that define your target group, enter a Target Group name and click on the Save as NEW target group button.
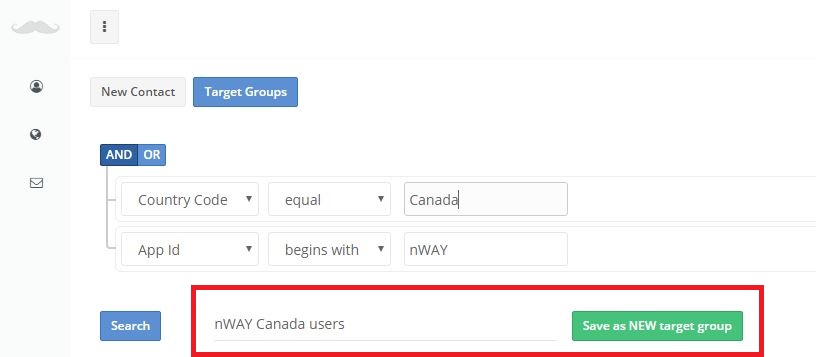
Before saving a new Target Group, click on
the Search button to test the filter.
Email Campaigns
Campaign Definition
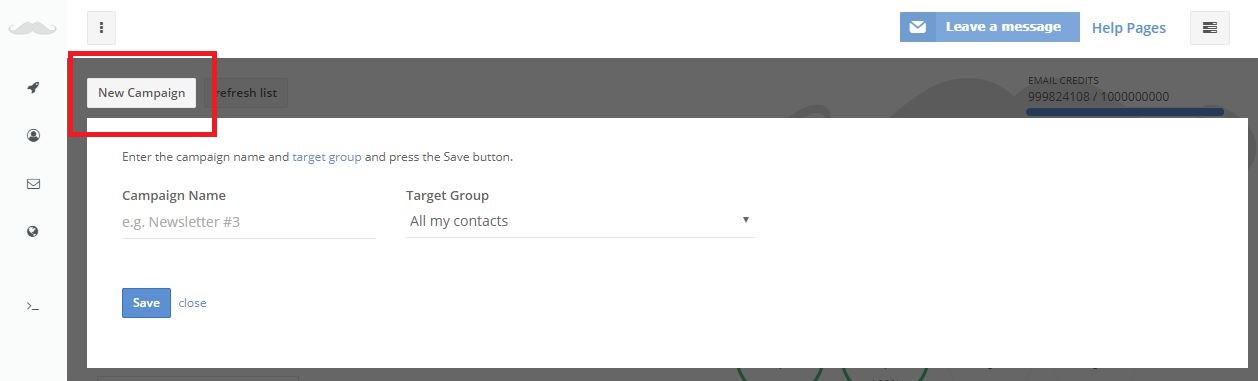
To create a new Email Marketing campaign, just click on the New Campaign button and set the campaign name and Target Group.
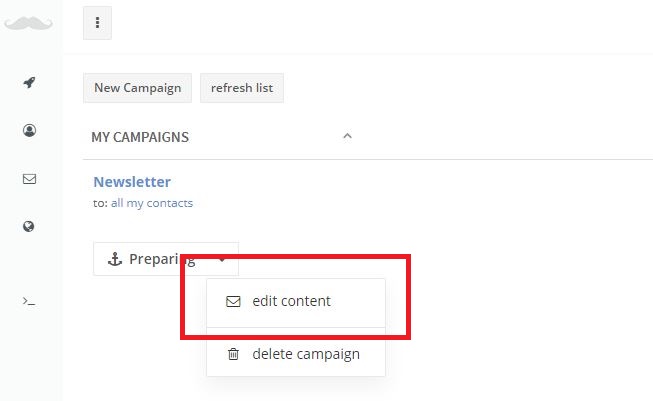
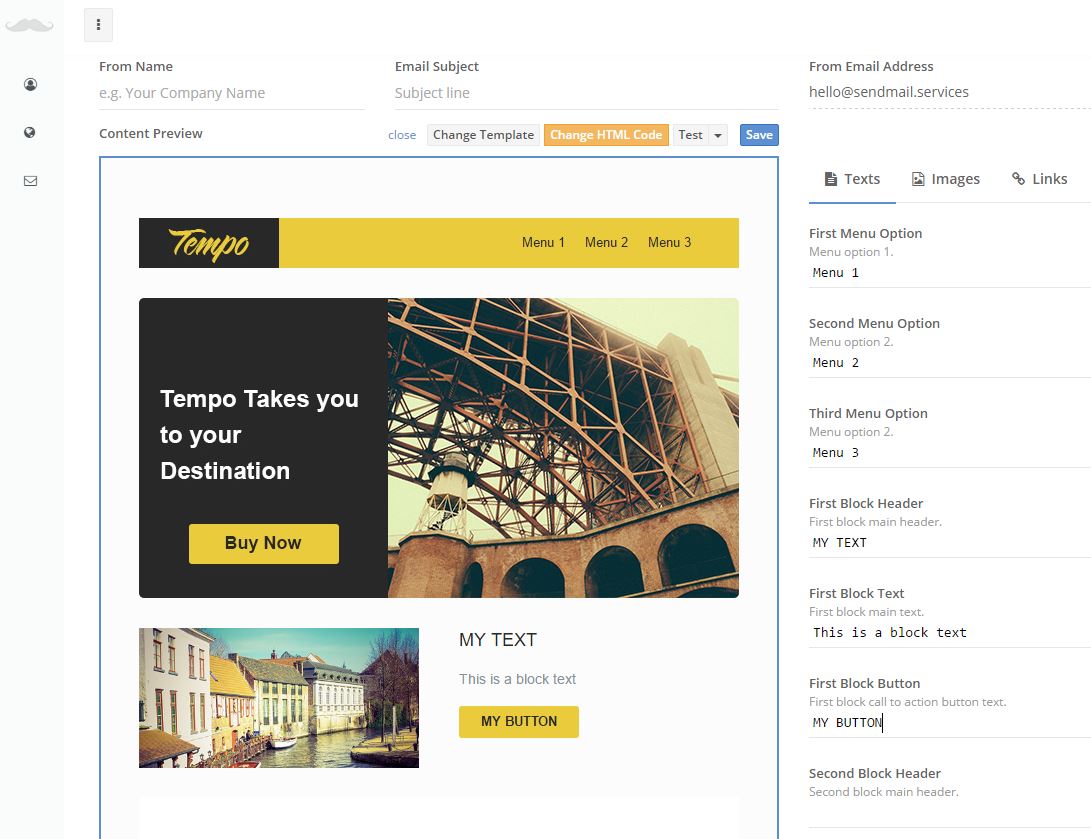
Once initially created, click on the Edit Content button to define the email content and attributes.
If you take a look at the next image, the content is defined by selecting the template you want to use and filling the text boxes on the right (and not directly on the HTML preview).
mustache.website templates use the
{{mustache}} technique so you can
build your content by just filling
a few textboxes.
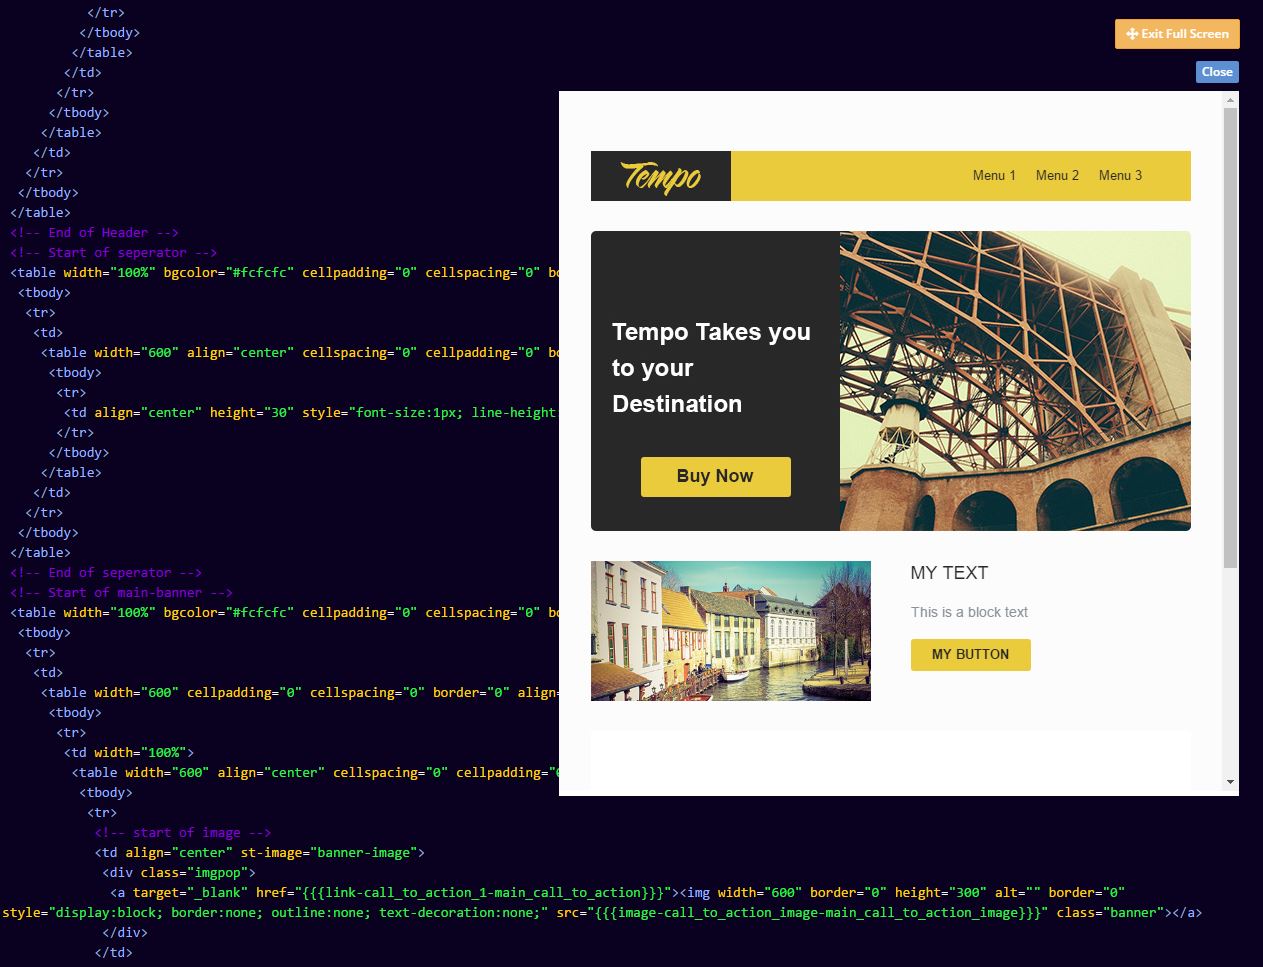
If the selected template needs some modifications to fit your needs, you can change the HTML code by clicking on the Change HTML Code button. Please note that you need to know how to code HTML to modify the email content template. We recommend those changes to be executed by an HTML specialist.
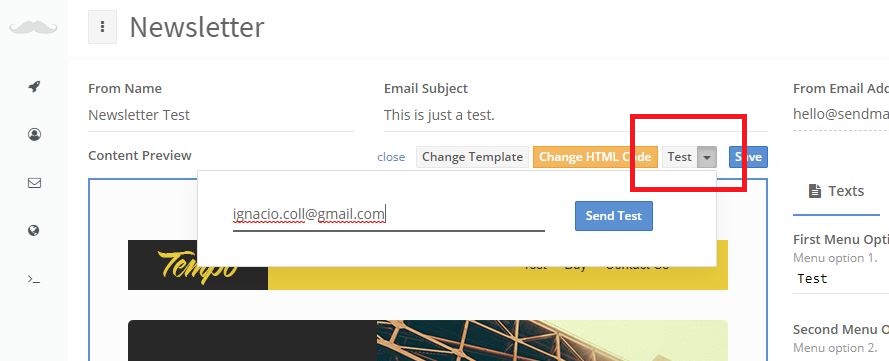
Send Test Email
To check how your Campaign email will look, you can send a test email and get the result in your email inbox. Once you’re done with all the required modifications, save, and your campaign will be ready to execute.
Campaign Execution
To start your Email Campaign click on the run the campaign option and Mustache.Website will start to send the emails to related Target Group.
You can pause a campaign by just
selecting the Stop campaign option.
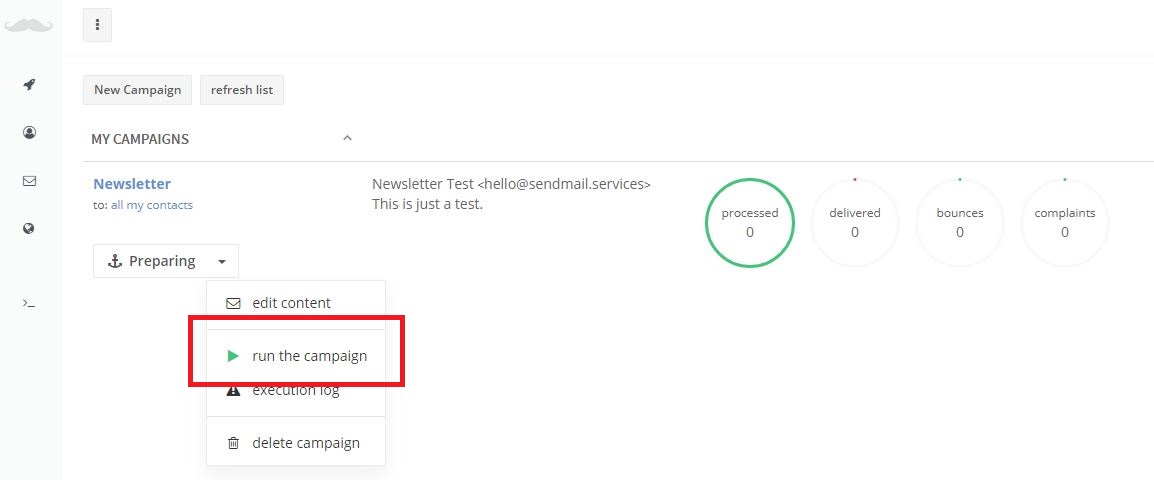
While running, you will get updates indicating the number of messages sent, the messages correctly delivered to destination email servers and the related bounces and complaints.
Landing Pages
Use Mustache.Website to create and host your landing pages for free.
Building a Web Page
You can use your own domain
to access your landing page.
To build and get online your landing page, click on the Page List menu option and then click on the New Landing Page button.

Select the Template you want to use, set a page name and a description to start.
The key point is that when the template gets selected, all the related {{mustaches}} will get listed so you only have to fill the related boxes and save your work to get your page online.
When saved, the page will get visible
on the Internet.
If you change the template, all the
previous values may be deleted.
Default URL
When your page gets saved, it’s hosted on AWS S3 instantly. To check how it looks, just go to your page default address by clicking on the top page link.
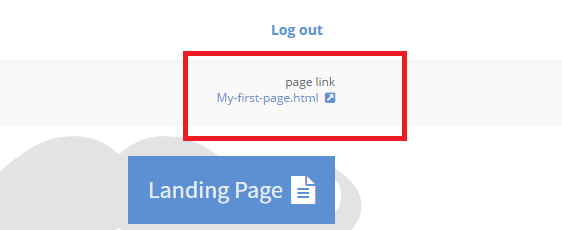
That link will look like https://s3-us-west-2.amazonaws.com/files.landingpage.services/us-west-2:ca67230b-4f84-43bb-96d7-7fcbfdf1a034/My-first-page.html, but of course you can use your own domain(s) if it’s required.
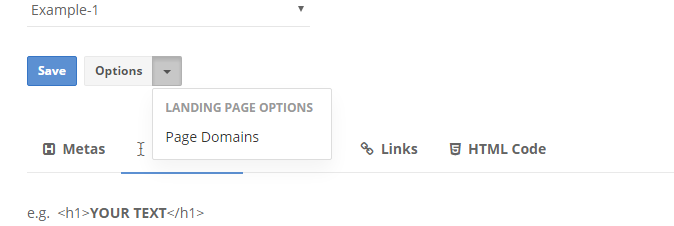
Use your domain(s)
A page can have multiple domains pointing to it!
To use your own domain create a new page as described above and click on the *Options+ button.
A popup will be displayed. Enter your domain (e.g. www.mydomain.com) and click on the Add button. Also remember to check the Default Page option if you want the current to get displayed as the default domain page.
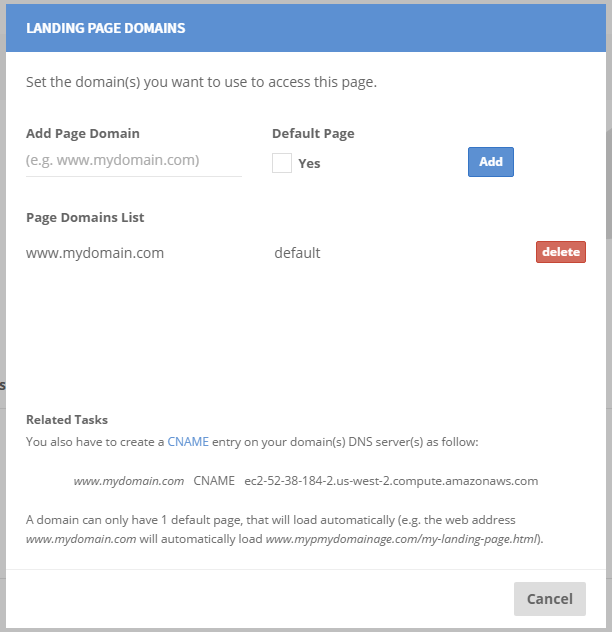
Please note that you also need to add a CNAME entry on your domain’s DNS server.
www.mydomain.com CNAME ec2-52-38-184-2.us-west-2.compute.amazonaws.com
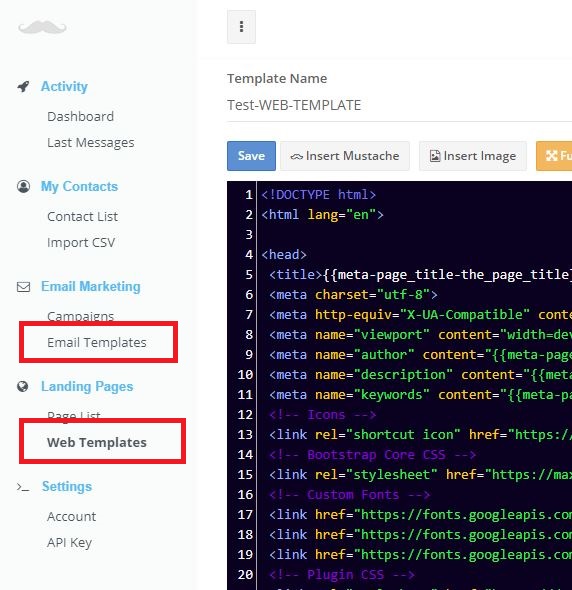
HTML Templates
A simple template example.
<!DOCTYPE html>
<html>

<head>
    <title>{{meta-page_title-the_page_title}}</title>
</head>

<html>
<body>

    <h1>{{text-header_text-big_text}}</h1>

</body>
</html>
Mustache.Website use HTML Templates to set the content for your Email Campaigns (and for your Landing Pages). When you create your service account, you get some Templates examples, but you certainly will be required to create your own.
All the templates you create will use the Mustache template technique. As a result your Email Campaigns or Landing Pages content will get defined very easily by just filling the “holes” or mustaches you define (e.g. you create a single newsletter template to use for all your newsletters).
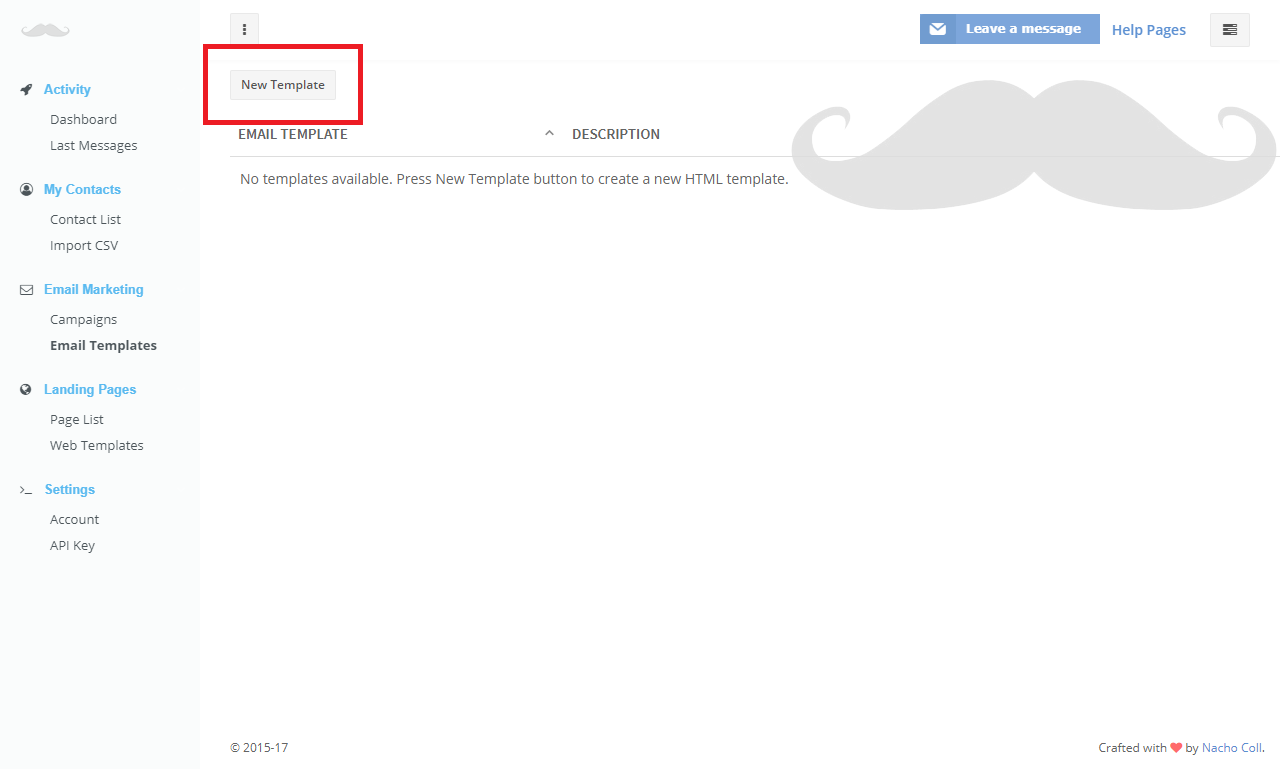
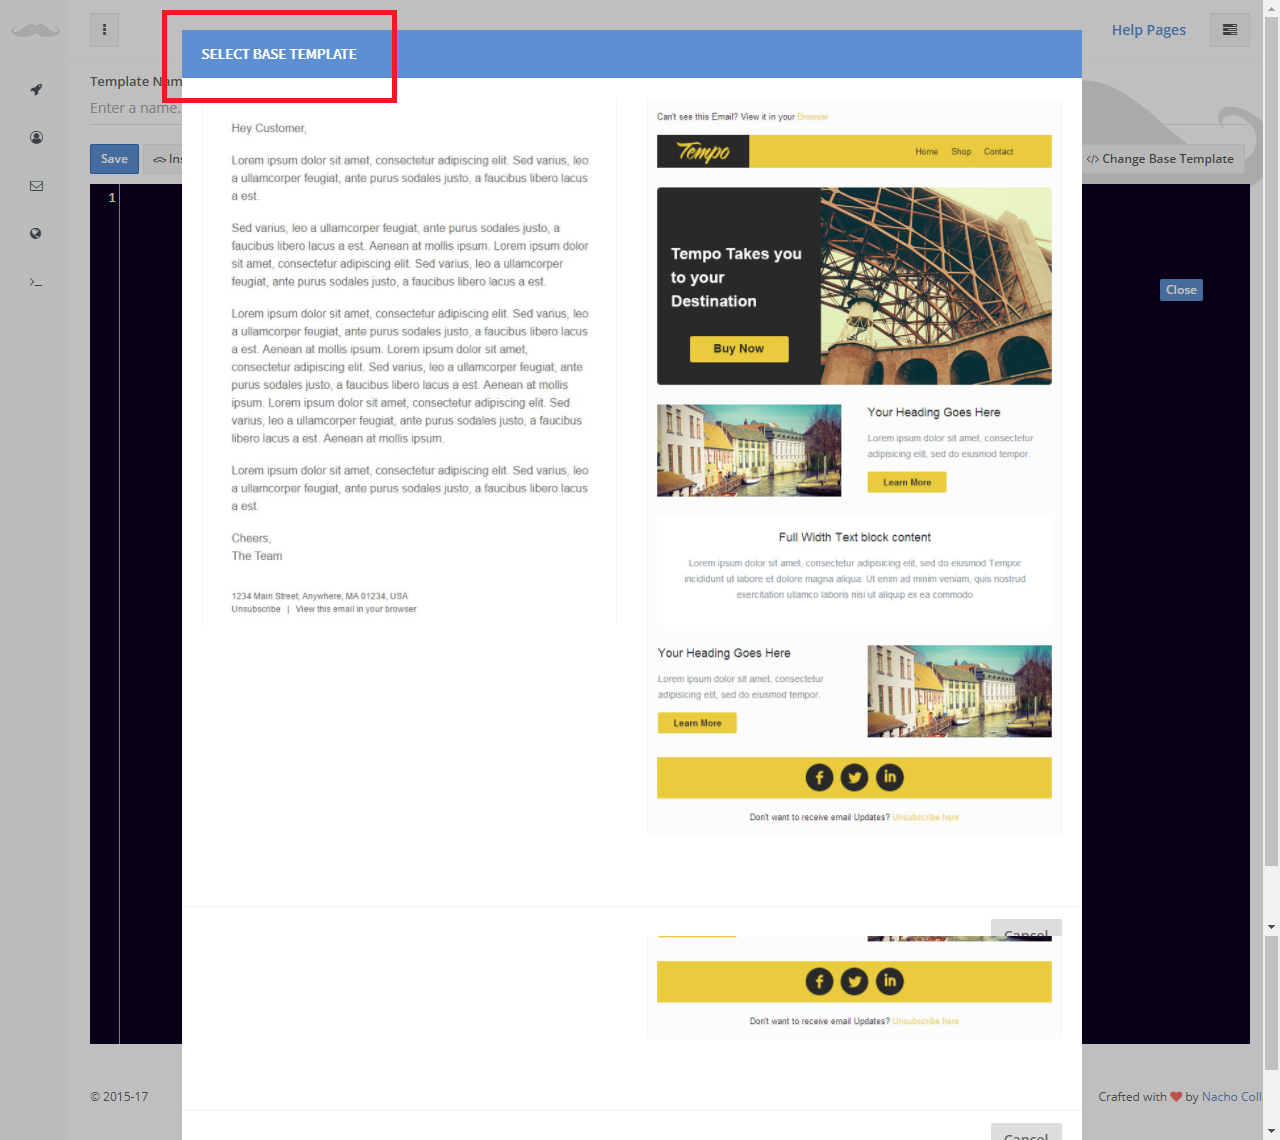
Create a Template
There are 2 types of Templates: Email Templates (to be used on your Email Marketing Campaigns) and Web Templates (for your Landing Pages).
To create a new Template you will be initially asked to select a Base Template to start from. If you want to build the template HTML code from scratch just cancel the initial selection dialog.
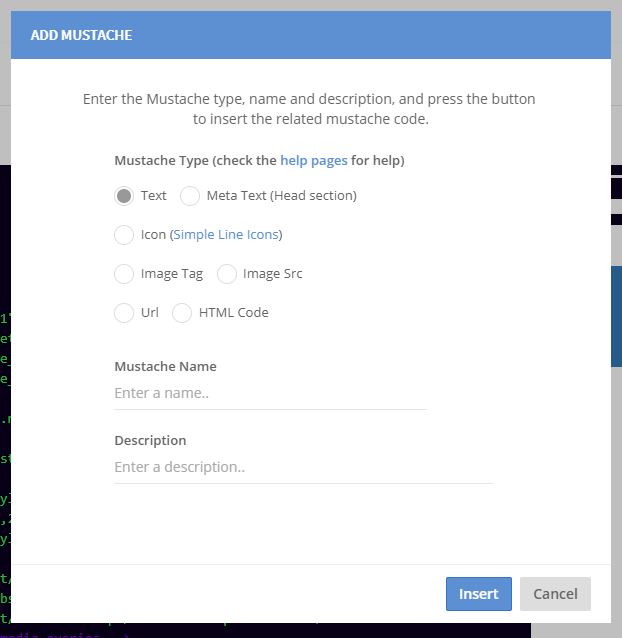
To insert a mustache in your HTML code,
you must use the correct format.

Use the Insert Mustache button (or press
the right button to get the
context menu).
To finish your template then, just write the HTML code as usual and create the “mustaches” the Marketing agent will be required to fill (the product image, the news text, etc).
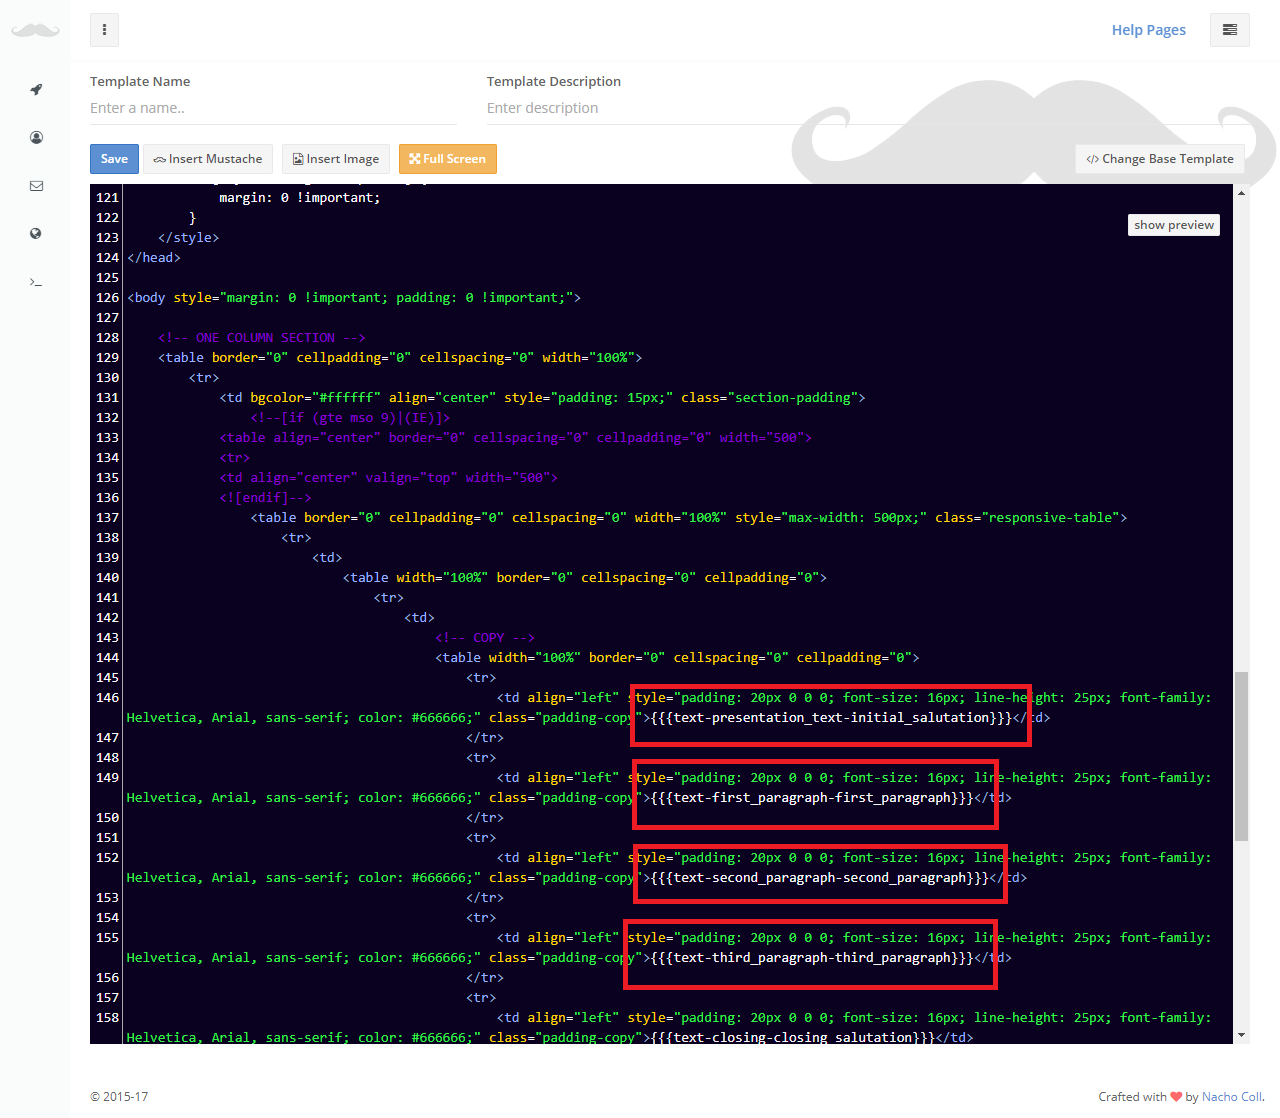
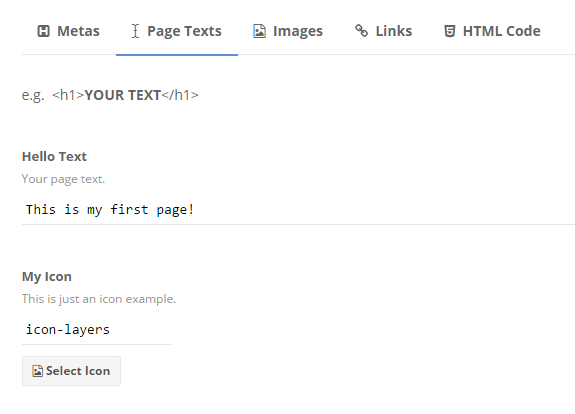
Available Mustaches
Mustaches are coded as follows:

{{<meta|text|icon|image|link|html>-<name>-<description>}}
You can use the next types of mustaches on your template HTML code:
- Meta Text to set text content on the head section (e.g.
<title>{{{meta-page_title-the_page_title}}}</title>).

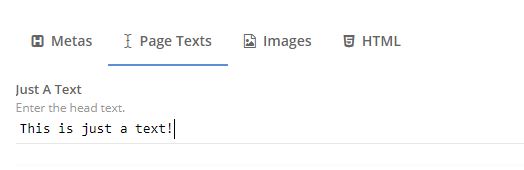
- Text to include non-formatted text, that is, the format is already set on the template (e.g.
<p class="text-primary">{{{text-just_a_text-enter_the_head_text}}}</p>).
- Icon so the final content creator can easely include a Simple Icon on the page (e.g.
<div class="feature-icon">{{{icon-my_icon-this_is_just_an_icon_example}}}</div>).
![]()
- Image Tag that will allow to insert a complete IMG tag and be more flexible on image styling (e.g.
<section class="header-image">{{{image-logo-the_logo_image}}}</section>).

- Image Src that will allow just to define the image src as the image styling is completely defined on the template (e.g.
<img src="{{{imagesrc-header_image-select_the_header_image}}}" />).

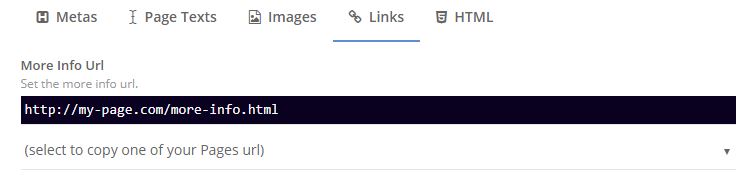
- Url to add a web address (e.g.
<a href="{{{link-more_info_url-set_the_mote_info_url}}}" >Click to go</a>).
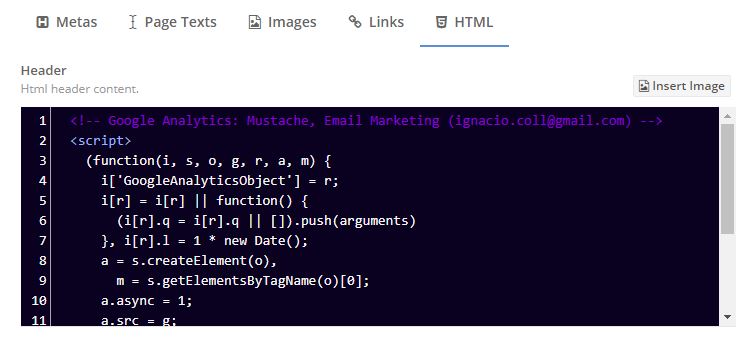
- and HTML to add any extra HTML code your content may require (e.g.
{{{html-header-html_header_content}}}).
API
Use the Mustache.Website API to:
- add new contacts (email receivers) programmatically,
- send transactional emails (emails not related with any campaign).
If your coding using dotNET, you can install the available Nuget package:
PM > Install-Package mustache.website.sdk.dotNET
API endpoint
To call mustache.website API methods, use https://api.mustache.website API endpoint .
For example, to create a new Contact, you call the metod https://api.mustache.website/contact/add
Authentication
Authentication example (select language on top)
$.ajax({
    method: 'POST',
    ...
    headers: {
      'Content-Type': 'application/json',
      'X-Api-Key': 'my-api-key'
    },
    ...
  });
MustacheAPI API = new MustacheAPI("my-api-key");
mustache.website uses API keys to allow access to the API methods. You can get an API key at the website.
We expect for the API key to be included in all API requests to the server in a header that looks like the following:
'X-Api-Key': 'my-api-key'
Passing parameters
Method call parameters must be passed in the Body part of the request message using JSON format.
The Content-Type header attribute must be set to application/json.
// How to set dates and numbers.

{

    ...

    "date" : "1482932562"

    ...

    "total" : 19.99

    ...

    "countryCode" : "FR"

    ...

}
Dates Format
When setting dates, use Unix time format.
For example, 1482932562 date value translates to Wednesday, 28-Dec-16 13:42:42 UTC.
Numbers Format
Numbers must use the dot “.” symbol as the decimal mark (f.ex. 20.99). This is due to JSON format requirements.
If you need to display a diferent format (f.ex. 20,99) please check Country Code parameter.
Country Code
Country code (f.ex. US) is used to format currency and date values (and also to calculate some country related statistics).
An example.
You may need to display date values using the French format (f.ex. 24/12/2017). In that case you must set countryCode to FR value.
Send Email
mailing/email/send
Send email example
var sendEmailJson = {
    "from": {
        "fromName" : "ACME Corporation",
        "fromAddress" : "hello@acme.com"
        },
    "destination": {
        "toAddresses" : [ "customer1@mycontacts.com", "customer-info@mycontacts.com" ],
        "ccAddresses" : [ "customer-sales@mycontacts.com" ]
    },
    "subject": {"data" : "Welcome to Acme!" },
    "body":
      {
        "html": { "data": "<span style=\"color:blue\">Hello!</span>"} ,
        "text": { "data": "Hello!"}
      }
};

$.ajax({
    method: 'POST',
    url: 'https://api.mustache.website/mailing/email/send',
    data: JSON.stringify(sendEmailJson),
    headers: {
      'Content-Type': 'application/json',
      'X-Api-Key': 'ExV0d92KzQ8QgsTVnevddpbB8cUaAfPs7ntVF8g0'
    },
    dataType: 'json',
    success: function (response) {
      console.log(response);
    },
    error: function (xhr, textStatus, errorThrown) {
      console.log(xhr);
    }
  });
MustacheAPI API = new MustacheAPI(<YOUR_API_KEY>);

SendEmailResponse response = API.SendEmail(new Model.Email() {
    From = new FromEmailAddress(){
        FromName = "ACME CORPORATION",
        FromAddress = "hello@acme.com"
    },
    Destination = new DestinationEmailAddresses() {
        ToAddresses = new List<string>() {
            "ignacio.coll@gmail.com", "hello@mustache.website"
        }
    },
    Subject = new TextContent() { Data = "Just a test from API Call." },
    Body = new EmailBody(){
        Html = new TextContent() {
            Data = "This is an HTML formatted <span style=\"color:blue\">text</span>!"
        }
    }
});
Use this method to send an email.
HTTP Request
POST https://api.mustache.webservice/mailing/email/send
Request Parameters
| Parameter | Type | Description |
|---|---|---|
| from | [FromEmail] | set your name and reply to email address |
| destination | [DestinationEmailAddresses] | set destination addresses |
| subject | [TextContent] | subject description |
| body | [EmailBody] | email body content, including text and HTML format |
FromEmail
| Parameter | Type | Description |
|---|---|---|
| fromName | string | address name, (e.g. ACME Corporation) |
| fromAddress | string | email address (e.g. hello@acme.com) |
DestinationEmailAddresses
| Parameter | Type | Description |
|---|---|---|
| toAddresses | list | list of destination addresses |
| ccAddresses | list | CC list of addresses |
| bccAddresses | list | BCC list of addresses |
TextContent
| Parameter | Type | Default Value | Description |
|---|---|---|---|
| charset | string | UTF-8 | sets the content character set |
| data | string | the text content (e.g. Hello, this is a message) |
EmailBody
| Parameter | Type | Description |
|---|---|---|
| html | TextContent | HTML content |
| text | TextContent | non-formatted content |
Send Email Response Parameters
Send email API response example
{
    "statusCode": 200,
    "statusMessage": "",
    "info": {
        "remainingCredits": 995,
        "bounceRatio": 0.3,
        "complaintRatio" : 0.1
    }
}
SendEmailResponse response = API.SendEmail( ... );

switch(response.StatusCode){
    case 200: // message sent.
        ...
        break;
    ...
}
When success (HTTP response code 200), you will get the next message in the body part as json text.
| Parameter | Type | Description |
|---|---|---|
| statusCode | number | The call execution result (check API Status Codes) |
| statusMessage | string | The result text message (e.g. error details) |
| info | [SendEmailResponseUserInfo] | Some user info |
SendEmailResponseUserInfo
Send Email response example when using invalid recipient address.
{
    "info": {
    "remainingCredits": 999999823,
    "bounceRatio": 0,
    "complaintRatio": 0,
    "prohibitedAddresses": [
        "bounce+9999988@simulator.amazonses.com"
        ]
    },
    "statusCode": 403,
    "statusMessage": "No destination addresses after checking related contacts bounces and complaints."
}
| Parameter | Type | Description |
|---|---|---|
| remainingCredits | Number | The remaining email credits |
| bounceRatio | Percentaje | Your current bounce ratio |
| complaintRatio | Percentaje | Your current complaint ratio |
| prohibitedAddresses | List of strings | The addresses deleted from the message |
Please take note that prohibitedAddresses attribute indicates the addresses that have been deleted from the message before sending due to bounces and complaints. When a recipient address is not valid or user sends a complaint/spam warning, we mark the related email as not-valid for sending.
Add Contact
contact/add
Add new contact example
var addContactJson = {
    "email": "hello@nachocoll.website",
    "firstName": "Nacho"
    "lastName": "Coll",
    "customAttributes":
      {
        "attributeName" : "origin" ,
        "attributeType" : "S",
        "AttributeValue" : "mobile"
      }
};

$.ajax({
    method: 'POST',
    url: 'https://api.mustache.website/contact/add',
    data: JSON.stringify(addContactJson),
    headers: {
      'Content-Type': 'application/json',
      'X-Api-Key': 'ExV0432KzQ8QgsTVnevddpbB8cUaAfPs7ntVF8g0'
    },
    dataType: 'json',
    success: function (response) {
      console.log(response);
    },
    error: function (xhr, textStatus, errorThrown) {
      console.log(xhr);
    }
  });
MustacheAPI API = new MustacheAPI(<YOUR_API_KEY>);

AddContactResponse response = mustacheAPI.AddContact(new Contact()
{
    Email = "hello@nachocoll.website",
    FirstName = "Nacho",
    LastName = "Coll",
    CustomAttributes = new List<CustomAttribute>() {
        new CustomAttribute() {
            AttributeName = "origin",
            AttributeType = CustomAttribute.AttributeTypes.Text,
            AttributeValue = "mobile"
        }
    }
});
Use this method to add a new contact (email receiver) to your list.
HTTP Request
POST https://api.mustache.webservice/contact/add
Request Parameters
| Parameter | Type | Description |
|---|---|---|
| string | the new contact email address | |
| firstName | string | contact first name [optional] |
| lastName | string | contact last name [optional] |
| customAttributes | list of [CustomAttribute] | contact attributes |
CustomAttribute
| Parameter | Type | Description |
|---|---|---|
| attributeName | string | the attribute name |
| attributeType | AttributeType | one of available types |
| attributeValue | string | the attribute value |
where AttributeType must be:
Sfor text value,Nfor number,D1for date formatted using day/month/year format,D2for date formatted using month/day/year format,D3for date using Unix time format (milliseconds).
Please note that attribute values will be converted to related attribute type. For example, if you set an attribute type N (number), and set a value like 'this is not a number', the API call will fail.
Add Contact Response Parameters
Add contact API response example
{
    "statusCode": 200,
    "statusMessage": ""
}
AddContactResponse response = API.SendEmail( ... );

switch(response.StatusCode){
    case 200: // contact added.
        ...
        break;
    ...
}
When success (HTTP response code 200), you will get the next message in the body part as json text.
| Parameter | Type | Description |
|---|---|---|
| statusCode | number | The call execution result (check API Status Codes) |
| statusMessage | string | The result text message (e.g. error details) |
API Status Codes
The mustache.website API uses the following status codes:
| Code | Meaning |
|---|---|
| 200 | The call was executed correctly |
| 400 | Bad Request – Check your request parameters |
| 401 | Unauthorized – Check your API key |
| 403 | Forbidden – Check your credits or bounce/complaint ratios |
| 404 | Not Found – Your API key is valid but there is no related user on our servers |
| 405 | Method Not Allowed – You tried to access with an invalid method |
| 406 | Not Acceptable – You requested a format that isn’t json |
| 409 | Conflict – Check for already existing values (e.g. already existing Contact (email)) |
| 410 | Gone – The requested object has been removed |
| 418 | I’m a teapot |
| 429 | Too Many Requests – Slow down! |
| 500 | Internal Server Error – We had a problem with our server. Try again later |
| 503 | Service Unavailable – We’re temporarially offline for maintanance. Please try again later |
Support
Do not hesitate to create a new issue
if you need help.
If you found an issue, please click here to open a new ticket or contact me on LinkedIn.
This is THE END ;)